-
Web
-
-
- 1. Create a new Submittal
- 2. Approve a Submittal
- 3. Reject (C) a Submittal
- 4. Reassign a Submittal
- 5. "Issue to" a Submittal
- 6. Publish a Submittal
- 7. Cancel a Submittal
- 8. Obsolete a Submittal
- 9. Comment on a Submittal
- 10. Export Submittal data
- 11. Re-Submit a Submittal
- 12. Notifications in Submittal
- 13. 'Private mode' in Submittal
-
-
- Articles coming soon
-
- Articles coming soon
-
- Articles coming soon
-
-
-
- Articles coming soon
-
- Articles coming soon
-
-
-
- Articles coming soon
-
- 2.1 View Drawing Set
- 2.2 Create 'Drawing Set'
- 2.3 Edit 'Drawing Set'
- 2.4 Delete 'Drawing Set'
- 2.5 View Drawings
- 2.6 Clone Drawings
- 2.7 Save Drawing(s) as Draft(s)
- 2.8 Presubmit Drawing(s)
- 2.9 Re-submit Drawing(s)
- 2.10 Edit Drawing
- 2.11 Cancel Drawing
- 2.12 Approve (A/B) Drawing
- 2.13 Reject (C) Drawing
- 2.14 Publish (A/B) Drawings
- 2.15 Publish (C) Drawings
- 2.16 Publish (D) Drawings
- 2.17 Reassign Drawings
- 2.18 'Issue To' Drawings
- 2.19 Approve (A/B) Drawings as a 3rd Party
- 2.20 Reject (C) Drawings as a 3rd Party
- 2.21 Reassign Drawings as a 3rd Party
- 2.22 For Info (D) Drawings as a 3rd Party
- 2.23 Supersede Drawings
- 2.24 Obsolete Drawings
- 2.25 Add distribution
- 2.26 Add Related Items
- 2.27 Mention users in action(s)
- 2.28 Mention users in comment
- Show Remaining Articles13 Collapse Articles
-
-
-
-
- 2.1 View Issues
- 2.2 Set Dtag Display
- 2.3 Set Column Display
- 2.4 Sort by Column
- 2.5 Open issue
- 2.6 Edit issue
- 2.7 Reopen Issue
- 2.8 Cancel Issue
- 2.9 Close Issue
- 2.10 Reassign Issue
- 2.11 Update Issue
- 2.12 Private mode
- 2.13 Comment on Issue
- 2.14 Perform Mass Actions (Update, Complete, Close, Edit, Comment)
- 2.15 Edit Distribution List
- 2.16 Add Related Items
- 2.17 Mention users in action or comment
- Show Remaining Articles2 Collapse Articles
-
- 4.1 View Issues in Tabular Report
- 4.2 View Issues in Photo Report
- 4.3 View Issue in Agenda Template
- 4.4 View Issue in MOM Template
- 4.5 View Issue in MOM Template
- 4.6 View Issues in '01 Defect Report - Done Status by Percent' Template
- 4.7 View Issues in '02 Defect Report - Done Status by Duedate / Confirm Date' Template
- 4.8 View Issues in '03 Defect Report - Closed Status by Percent' Template
- 4.9 View Issues in '04 Defect Report - Closed Status by Duedate / Confirm Date' Template
- 4.10 View Issues in the Inactive Summary Report
- 4.11 View Issues in the Agenda by Stakeholder
-
AECIS
-
-
-
- Articles coming soon
-
- Articles coming soon
-
- Articles coming soon
-
-
Contact Support
2. Create Daily Report
A. General Report:
In the Report tab, there is a pre-designed information page according to the project, detailing specific issues on the site. Report creators only need to click on ‘Report’ to enter information using the existing report template. If users want to provide more detailed descriptions, they can add additional files in the ‘Attachment(s)’ tab.
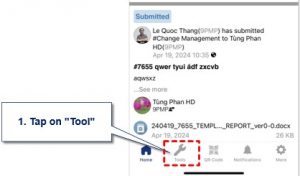
Step 1: On the project home page, at the bottom of the screen, the user selects “Tools.”
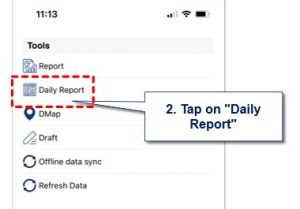
Step 2: Select Daily Report.
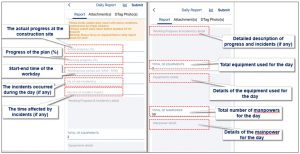
Report Template on the Mobile Platform
The illustration above depicts a default-designed report template with defined concepts as follows:
- Actual progress: The actual project completion progress on-site.
- No of site incident(s): Number of incidents occurring at the site during the day (if any).
- Working Progress & Incidents detail(s): Detailed description of project progress and site incidents (if any).
- Total of manpower: Total number of workers on-site for the day.
- ManPower Detail: Detailed description of tasks performed by workers on-site.
- Planned Progress: Progress of the ongoing plan completion (in percentage).
- Hour(s) of incident(s) impact: Total time disrupted by incidents on-site (if any).
- Total of Equipments: Total equipment used on-site for the day.
- Equipment(s) Detail: Details of equipment used on-site for the day.
- Working Hour Period: Start and end time of construction activities on-site.
B. Uploading attachment(s)
The “Attachment(s)” tab allows users to upload detailed report files regarding issues on the site (if any).
Note: The system only supports uploading attachments in PDF format.
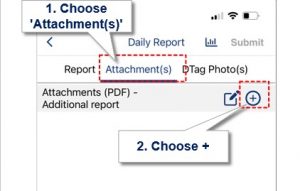
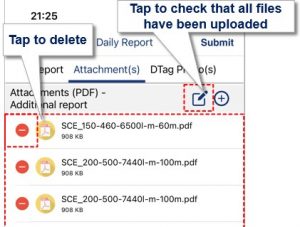
- Users simply need to tap on the ‘Attachment(s)’ Then tap on the ‘+’ button to locate files in their folders and select the file to upload.
C. Uploading Dtag Photo(s)
– Dtag Photo(s) is the area where photos with the same theme/content/area are grouped together on the same report page for easier tracking and management. Users can use existing Dtags or create their own Dtag Photo(s) to group these photos together.

Step 1. Users tap on “Dtag Photo(s)”
Step 2. In the Dtag Photo(s) tab, select the Dtag that corresponds to the report photo
Step 3. Choose an existing report photo to upload, or select to take a new report photo.
After successfully uploading the report photo with the Dtag, the screen will display the following information that users need to pay attention to :
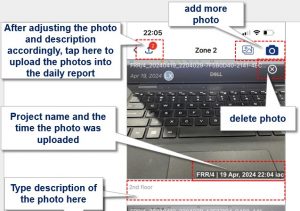
- The information displayed in the bottom right corner of the image shows: the project name and the date and time the image was uploaded.
- To delete an image, users simply tap the ‘X’ in the top right corner of the image they want to remove.
- To add a detailed description to the report photo, users tap on ‘caption.’